
SDL2/OpenGL in C: 1 - Display an Image

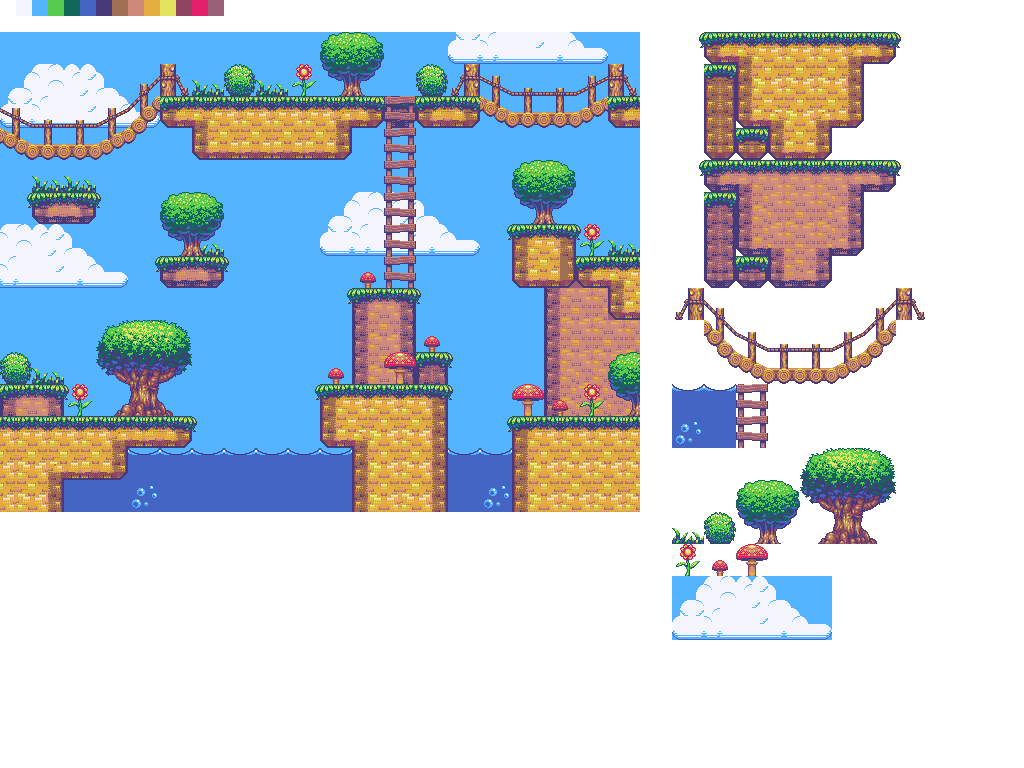
Now that we have a window (see tutorial 0 in this series, if you haven't done it yet), we can render some graphics to it. For this tutorial and some of the future ones in this series, we will need a game graphics set, so let's get a public domain one from OpenGameArt.org. We are going to use this one. You can download the full tile set here. Create a new subdirectory named assets in the project directory, and save this file there.1
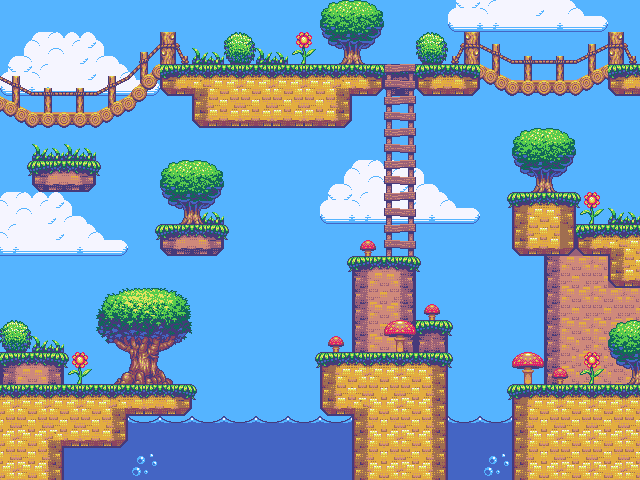
This is an example of what we could make using this tileset.
Now, copy test.c from the previous tutorial to render.c2 and open that in your favorite code editor. Directly after the line screen = SDL_GetWindowSurface(window) add some new lines. This is where we are going to load the image. Add the following lines here.
// Load image (returns NULL on fail)
SDL_Surface* image = IMG_Load("assets/generic_platformer_tiles_1.png");
This will load the image. If it fails, the function will return NULL. We will use this to do error checking later. This function is defined in SDL_image.h, so we will need to add #include <SDL_image.h> to our includes at the top of the file.
Next we need to add the rendering code. This will happen in the while (run) loop, after the event handling loop. Directly after the event handling loop, we want to first clear the screen buffer, then render the image to it, and then copy it to the actual window. We do this with the following.
SDL_FillRect(screen, NULL, 0x00000000);
SDL_BlitSurface(image, NULL, screen, NULL);
SDL_UpdateWindowSurface(window);
The first function draws a filled rectangle to the designated surface. The first argument is the surface. The second is a struct defining a rectangular area. If the second argument is NULL though, it fills the entire surface. The final argument is a 32-bit color, in this case black. Next we copy the image to the screen buffer surface. The NULL arguments are rectangles for defining where from and to on the respective surface to operate. We will look at this in more depth in the next tutorial. The final function displays the current screen buffer in the window. It allows us to do all of our rendering behind the scenes before displaying the completed scene to the user.
Lastly, outside of the game loop, before destroying the window, we need to free the image surface.
SDL_FreeSurface(image);This should do it for our C code. Now we need to add this new program to our Makefile. First we will add render.exe to the all rule. Then we will add a new rule for render.exe. This is what your Makefile should look like now.3
all: test.exe render.exe

test.exe: test.c
	gcc test.c -w -Wl,-subsystem,windows -lmingw32 -lSDL2main -lSDL2 -o test.exe

render.exe: render.c
	gcc render.c -w -Wl,-subsystem,windows -lmingw32 -lSDL2main -lSDL2 -lSDL2_image -o render.exe
Note that for render.exe, we've had to add SDL2_image to the list of libraries to link to. That is where IMG_Load() is.
From there we can run make, and it will build render.exe, which we can then run. That should bring up a window that displays part of the image file we downloaded.
In case you are having issues getting your code to compile or work (or were confused about where to put things), here is the full source code.
#include <SDL2/SDL.h>
#include <SDL2/SDL_image.h>
#include <stdio.h>

#define SCREEN_WIDTH 800
#define SCREEN_HEIGHT 600

SDL_Window* window = NULL;
SDL_Surface* screen = NULL;

int main(int argc, char* args[]) {
	// Initialize video system
	SDL_Init(SDL_INIT_VIDEO); // Returns 0 on success

	window = SDL_CreateWindow("SDL2 Tutorial",
	                          SDL_WINDOWPOS_UNDEFINED,
	                          SDL_WINDOWPOS_UNDEFINED,
	                          SCREEN_WIDTH,
	                          SCREEN_HEIGHT,
	                          SDL_WINDOW_SHOWN); // Returns NULL on fail

	screen = SDL_GetWindowSurface(window);

	// Load image (returns NULL on fail)
	SDL_Surface* image = IMG_Load("assets/generic_platformer_tiles_1.png");

	SDL_Event e;
	uint8_t run = 1;
	while (run) {
		// Handle events
		while (SDL_PollEvent(&e)) {
			if(e.type == SDL_QUIT)
				run = 0;
		}

		// Render graphics
		SDL_FillRect(screen, NULL, 0x00000000);
		SDL_BlitSurface(image, NULL, screen, NULL);
		SDL_UpdateWindowSurface(window);
	}

	SDL_FreeSurface(image);
	SDL_DestroyWindow(window);
	SDL_Quit();

	return 0;
}
I won't be able to post full source code files for every tutorial. Once they get too big to include here, I'll make a Github repository and post the full source code there. I'll try to post full source code here when I can though, so that you don't have to go to an external site to see it.
In the next tutorial, we will learn to pull tiles out of an image that contains a collection of identically sized image tiles and place them exactly where we want them on the screen.
If you can’t find your home directory that MSYS2 starts in when opening a new window, look under C:\msys2\home. There should be a folder under that with your Windows username or at least starting with part of it. Once you are in the folder with your username, you’ll go to the project folder you made for this tutorial series and save the file in the assets folder under that.
In the MSYS2 terminal files can be copied with the cp command. For example, in the project directory, enter the command cp test.c render.c. Alternately, you can copy test.c by opening it in an editor and saving it as render.c.
If you are using Linux or MacOS, you may need to skip a significant portion of the compile command. For example, compiling on a Raspberry Pi running Raspberry Pi OS (a Debian Linux based operating system), the correct command to compile render.c is gcc render.c -lSDL2 -lSDL2_image -o render. (The -w switch is optional and will suppressing compiler warnings. The Lazy Foo tutorial series includes it, however it is often useful to see warnings. Sometimes they can be ignored, but many times they indicate bugs in your program that could cause unexpected problems later. Once we get past the introductory material, I will omit it from the remainder of the tutorials.) If you used the Lazy Foo tutorials setup section for your platform, use the compile command given there, but use gcc instead of g++. If you did not use that or the instructions given in this series, I can only assume that you probably know what you are doing well enough to figure it out on your own.